If you’re spending any serious time in the Linux terminal, sooner or later you’ll run into APT. Whether you’re installing tools like usermod, monitoring logs with multitail, converting videos with HandBrake, or storing credentials securely in KeePassXC, APT is usually the layer that makes everything possible behind the scenes.
APT (Advanced Package Tool) is the standard package manager for Debian-based distributions such as Ubuntu and Linux Mint. It acts as a bridge between you and thousands of software packages available in repositories. Instead of downloading software manually, compiling it, and resolving dependencies yourself, APT does all of that for you — quickly and reliably.
Warp offers a lot. While I think it’s unlikely to be a permanent fixture on my machines, it might be a good fit if you’re happy using proprietary software.
Working in the Linux terminal often involves commands like pwd, ls, or administrative tools such as useradd, along with editing configuration files in tools like the vim editor or the visudo editor. At some point, you’ll need to copy command output quickly—whether you’re documenting something, debugging, or sharing results. While it may seem like a small task, doing it efficiently can significantly improve your workflow, especially if you spend a lot of time in the terminal.
When working in the Linux terminal, it’s common to inspect configuration files or logs with pagers such as less or more. These tools are designed for viewing files efficiently, not editing them. However, many Linux users don’t realize that you can quickly jump from a pager directly into a text editor like Vim without closing the viewer first.
Si vous êtes comme votre blogueur préféré (hi hi) et que vous avez des tonnes de fichiers markdown qui traînent dans des dossiers obscurs depuis des années, voici l'outil parfait pour rendre tout ceci à nouveau utilisable dans la vraie vie.
En tout cas, c'est plus pratique qu'un grep !
Ça s'appelle QMD (Quick Markdown Search) et c'est un outil en ligne de commande dispo sur GitHub qui va indexer tout votre bazar de notes pour les rendre consultables rapidement. QMD combine la recherche plein texte classique (BM25) avec de la recherche vectorielle sémantique et du re-ranking via LLM, ce qui veut dire que c'est ultra puissant. On est un peu sur le même principe qu'un RAG en fait puisque l'IA locale est utilisée pour comprendre le sens de votre requête et pas juste chercher des chaînes de caractères bêtes et méchantes. J'utilise depuis un petit moment maintenant un système similaire avec LEANN pour indexer tous les articles de korben.info et retrouver des connexions entre mes contenus, et je peux vous dire que quand on goûte à la recherche sémantique, le bon vieux grep a un goût de carton.
L'outil est même capable de faire de l'expansion de requête (Query Expansion) pour deviner ce que vous cherchez vraiment.
Techniquement, ça tourne avec
bun
ou npm et ça s'appuie sur
node-llama-cpp
pour faire tourner des modèles GGUF directement sur votre machine. Tout reste chez vous donc niveau vie privée c'est nickel. C'est un peu la même philosophie que des outils comme
Khoj
ou
Blinko
dont je vous ai déjà parlé, mais en version CLI pour le terminal.
L'installation est hyper facile si vous avez déjà Bun, mais prévoyez quand même un peu de place (environ 3 Go) pour les modèles qui iront s'installer au chaud dans ~/.cache/qmd/models/ et installez sqlite si vous êtes sur macOS :
brew install sqlite # Pour macOS
npm install -g @tobilu/qmd
Ensuite, y'a plus qu'à vous créer vos collections en pointant vers vos dossiers, et en lançant l'indexation comme ceci :
qmd collection add ~/mes-notes --name notes
qmd embed # L'étape indispensable pour générer les vecteurs
Et hop, vous pouvez lancer des recherches !!
C'est magique ! Perso, j'utilise presque tout le temps la commande "qmd query" plutôt que "search" parce que le mode hybride est bien plus puissant je trouve. Vous avez aussi "qmd vsearch" si vous voulez une recherche purement sémantique, genre quand vous cherchez un concept sans connaître les mots exacts utilisés dans vos notes. En fait, quand vous tapez une requête, QMD va chercher via les mots-clés, via les vecteurs (le sens), puis fusionner tout ça avec un algo RRF, et refaire passer un petit coup de LLM par dessus pour trier les résultats par pertinence.
Après vous l'aurez capté en me lisant, si vous avez une machine un peu ancienne sans GPU costaud, l'étape de re-ranking risque de prendre un peu de temps... mais c'est le prix de la qualité et de la sécurité ^^.
D'ailleurs, si vous utilisez Claude Desktop ou Claude Code, sachez que QMD intègre également un
serveur MCP
(Model Context Protocol). Du coup, vous pouvez connecter QMD à Claude et lui permettre d'aller fouiller dans vos notes pour répondre à vos questions. Et bonne nouvelle, QMD propose maintenant un mode HTTP daemon (qmd mcp --http --daemon) qui garde les modèles chargés en mémoire, ce qui évite de les recharger à chaque requête. Attention par contre, dans ce cas précis, les extraits de vos notes seront envoyés à Claude (donc dans le cloud).
QMD est aussi dispo en tant que librairie Node.js (npm install @tobilu/qmd) pour ceux qui voudraient l'intégrer dans leurs propres scripts ou workflows d'automatisation. Avec les options --json et --files en sortie, ça se branche facilement dans un pipeline.
Perso je trouve ça génial parce que ça comble le fossé entre le simple fichier texte et les usines à gaz de gestion de connaissances. Par exemple, si vous êtes un grand adepte de
Silverbullet
ou d'
Obsidian
, c'est le top pour l'indexation globale de vos écrits.
Voilà, si vous voulez un moteur de recherche personnel qui en a sous le capot et qui respecte votre vie privée, foncez tester ça.
Splitter son terminal en plusieurs panneaux, gérer des sessions persistantes, le tout avec les mêmes raccourcis que tmux... mais sous un bon gros Windows des familles, nativement, en Rust et sans avoir besoin de se galérer avec WSL !
C'est exactement ce que fait
psmux
, un multiplexeur de terminal conçu pour PowerShell et cmd.exe qui utilise directement l'API ConPTY de Windows 10/11. Du coup, pas de couche d'émulation Unix, pas de Cygwin, pas de MSYS2... ça tourne direct sur votre bécane.
Pour ceux qui débarquent, un multiplexeur de terminal ça permet de découper votre console en plusieurs zones (des "panes" que j’appellerai "panneau" parce que merde c'est + français), de jongler entre plusieurs sessions, et surtout de retrouver votre boulot exactement là où vous l'avez laissé même après une déconnexion. Sous Linux, tout le monde utilise tmux pour ça mais sous Windows, jusqu'ici c'était soit WSL (installer tout un sous-système Linux juste pour splitter un terminal, c'est un peu overkill quand même !), soit des splits basiques via Windows Terminal qui ne gèraient ni les sessions persistantes ni le détachement. Snif...
psmux en action sous PowerShell
L'installation est rapide. Un petit winget install psmux et hop, c'est réglé. Ça passe aussi par Cargo, Scoop ou Chocolatey pour les puristes. Ensuite, vous tapez psmux dans PowerShell 7 et vous retrouvez vos marques : Ctrl+B pour le prefix, les mêmes commandes split-window, new-session, attach... L'outil implémente 76 commandes tmux avec plus de 126 variables de formatage. Et y'a même un mode copie Vim avec 53 raccourcis clavier.
Bref, si vous avez une mémoire musculaire ultra développée pour tmux, vous êtes chez vous !
Et le truc cool, c'est que psmux lit directement vos fichiers .tmux.conf existants. Du coup, vos raccourcis custom et pas mal de thèmes (Catppuccin, Dracula, Nord...) fonctionneront directement, même si les configs tmux les plus complexes avec des scripts bash ou TPM peuvent nécessiter des ajustements. Et y'a aussi
Tmux Plugin Panel
pour vous accompagner dans l'ajout de plugins et de thèmes.
Alors je vous connais les raloux sous OuinOuin, vous allez me dire "Windows Terminal fait déjà des splits avec Alt+Shift+D"... sauf que non, c'est pas pareil. Windows Terminal découpe votre fenêtre visuellement mais ne gère ni les sessions persistantes, ni le scripting, ni le détachement. Avec psmux, vous lancez une session le lundi, vous fermez votre terminal, vous revenez le mardi et tout est encore là : vos panneaux, vos processus, votre historique. C'est ça la vraie différence avec un simple split visuel.
Côté support souris, c'est complet : clic pour sélectionner un panneau, drag pour redimensionner les bordures, molette pour remonter dans l'historique du buffer. Tout est activé par défaut, pas besoin de rajouter set -g mouse on comme sous tmux. L'outil tourne sous Windows 10 et 11, et le projet est sous licence MIT.
Après c'est encore jeune et y'a quelques galères connues notamment le support des caractères CJK et UTF-8 multi-octets qui peut se planter comme une merde sur des textes longs. Et split-window -c ne préserve pas toujours le répertoire courant (oubliez pas de vérifier votre pwd après un split). Par contre, le dev répond en quelques heures, et des PR externes sont mergées régulièrement... donc c'est bon signe !
Bref, c'est propre, c'est natif, et ça lit vos .tmux.conf ! Que demande le peuple barbu emprisonné sous Windows, finalement ? Eh bien pas grand chose de plus pour être heureux.
There is simply no shortage of terminals for Linux. And yet we keep on seeing new terminals coming up almost every year.
The regular terminal works but then there are terminals like Kitty and Ghostty that provide modern features and customization.
In the same regard, foot is also a good terminal worth having a look. It is not a new project. It has been an active player for sevaeral years and yet not many Linux user have heard of it.
Foot terminal
Foot is a fast and lightweight Wayland-native terminal emulator. Older terminal emulators were designed around X11 and later gained Wayland support, while Foot is a terminal emulator designed specifically for Wayland from the beginning. Modern GPU terminals like Kitty or Alacritty instead support both X11 and Wayland as first-class backends.
Let me show you some of the features of Foot terminal that provide significant value to the user.
Sixel image support
With the Sixel image support, terminals can display actual images. Foot supports the sixel protocol and thus you can view real images in it without extra effort.
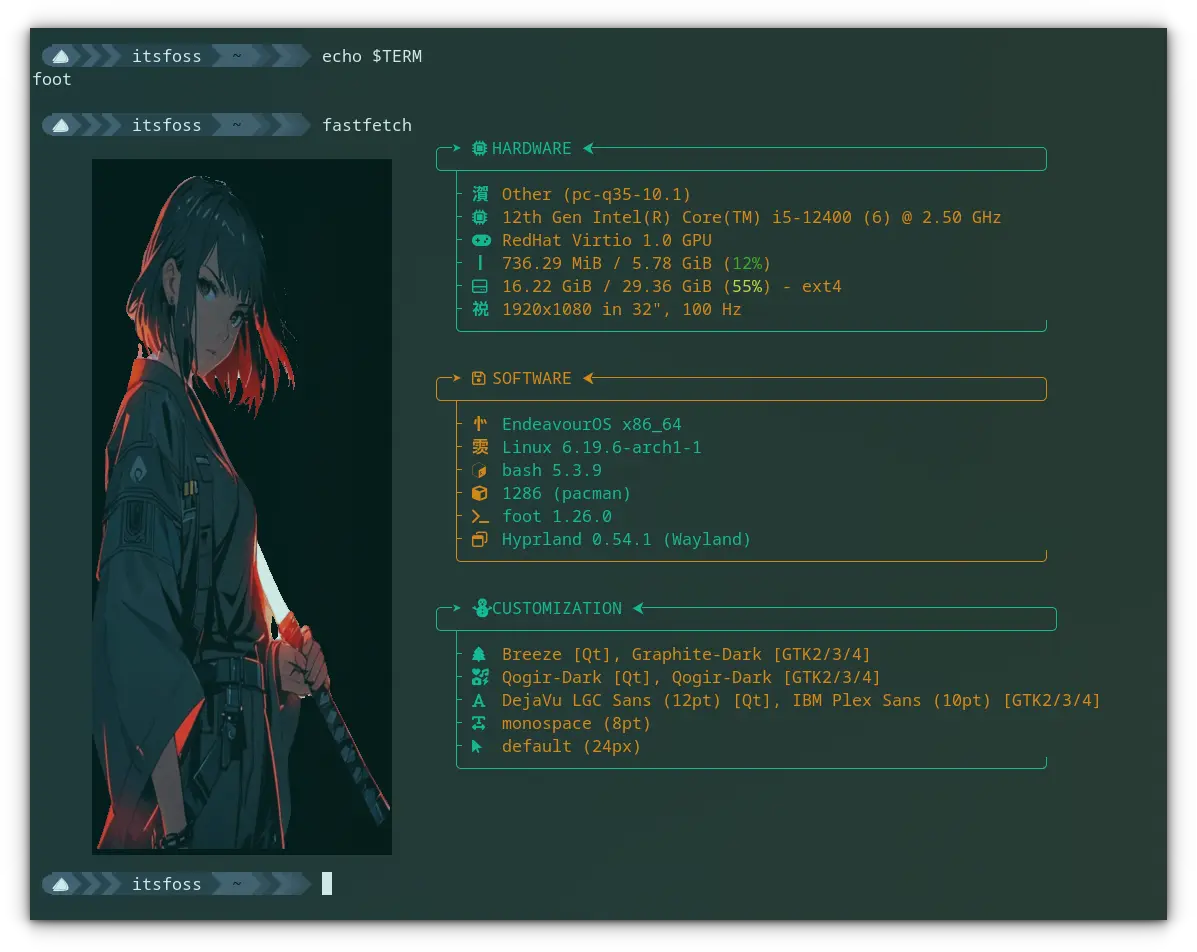
What's the point? Well, if you are using terminal tools like fastfetch, you can display real images in terminal instead of the usual ASCII renderings. Look at the image below for example:
Foot Terminal Image Support
Also, terminal file managers like Yazi can show image file previews in a preview pane with the image support.
Scrollback search
Imagine you executed a command and it produced a long output. Normally, you cannot search in the command output displayed on the screen.
Foot supports scrollback search. If you have a huge scrollback of thousands of lines, the ability to search through it is a game changer.
0:00
/0:32
Using the Scrollback search feature.
Press CTRL+SHIFT+R to search a scrollback history. You will get a search prompt at the bottom-right of your screen. Enter search string and you can see that results are live updating.
Keyboard-driven URL detection
Some terminal output may contain URLs. For example, I use hyperlinks in markdown notes and preview them using Glow. In this case, I can press the shortcut CTRL+SHIFT+O to highlight links.
When you press the shortcut, you can see that small alphabetic characters are attached near the links. Press the associated character, and that link is opened in your default web browser.
🗒️
I use Qutebrowser as my main browser. It also follows a similar hyperlink navigation, so everything feels cohesive.
You can press the ESC key to quit the URL mode.
A clip showing opening links using URL mode in Foot terminal emulator.
Server-daemon mode
In server-daemon mode, one process hosts multiple windows. It offers reduced memory footprint, reduced startup time, etc.
But do remember, if the main process crashes, all windows go down with it.
To get server mode in Foot, start the foot server along with desktop login. That is, you need to auto-start the command:
You cannot write a configuration if you don't know what modules are available for you to customize. Don't worry! Foot provides a concise description of available modules in a separate man page. Open a terminal and use the command:
man foot.ini
Read the page once before starting to configure.
Options that you may require
In this section, we will see some of the useful configuration keys.
Change the Shell
The shell option sets a different shell to the Foot Terminal without altering the default system shell.
The syntax is shell = /usr/bin/zsh. You can use the which command to find the path to the shell to use.
Change Font
Changing font is one of the most important parts of any customization. And Foot provides the font- variables for the purpose:
font = IBM Plex Mono:size=14: Sets the font to IBM Plex Mono and sets the size to 14.
font = Ubuntu Mono:wieght=bold:size=14: Sets the bold font to Ubuntu Mono and sets the size to 14.
font = JetBrains Mono:weight=bold:slant:italic:size=14: set the bold-italic font to JetBrains Mono and size set to 14.
Include another config
Splitting up the configuration will enable you to maintain and modify it easily in a later stage. And this is the best approach for theme customization.
For example, let's see how you can set a Catppuccin Mocha theme to the foot terminal.
Visit the Catppuccin Foot theme GitHub repository. Go to the themes/catppuccin-mocha.ini file and download it using the download button at the top of the page, as shown in the screenshot below.
Now, create a directory with the command:
mkdir -p ~/.config/foot/themes/
Paste the downloaded catppuccin-mocha.ini file inside this directory. Assuming you have downloaded the file to the ~/Downloads directory, use the command:
Now, we need a little troubleshooting. With the latest update, Foot color schemes need a [colors-dark] module, and the Catppuccin comes with [colors]. Just open the file:
nano ~/.config/foot/themes/catppuccin-mocha.ini
And edit the [colors] to [colors-dark] and save it.
One more step. Open the foot.ini config file in your favorite editor: