How to Take Screenshots in Linux Mint [Beginner's Tip]
Linux Mint is known for being simple and beginner friendly. It works out of the box with most essential features ready to use, so you don’t have to spend time setting things up. One such basic task is taking screenshots, and Mint makes it very easy even if you are completely new to Linux.
In this beginner's guide, we will look at the built-in screenshot tool in Linux Mint and the keyboard shortcuts you can use right away.
The GUI screenshot tool that you don't want to miss
Linux Mint provides a simple graphical interface for those who prefer a GUI solution for taking screenshots.
Beyond the basic options, the tool also includes a few useful features. Let’s take a look at them next.
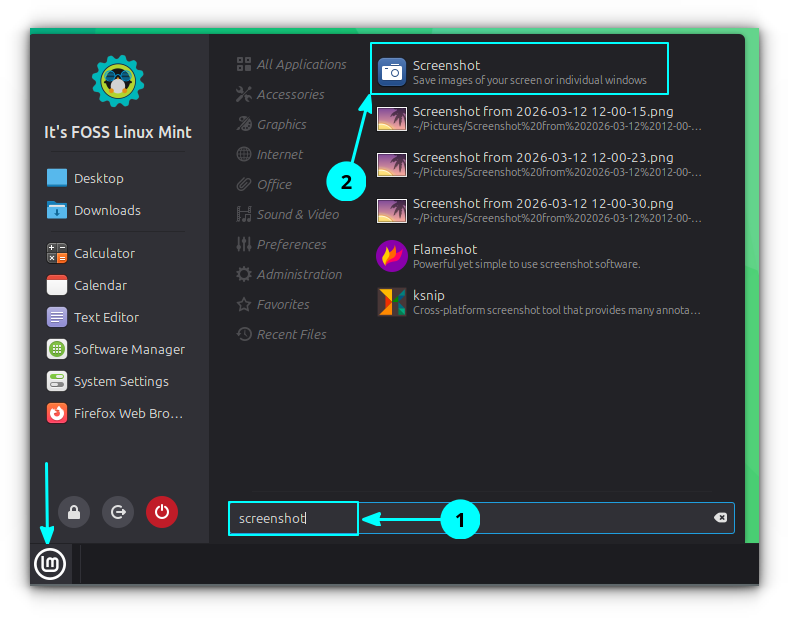
First, open the Screenshot tool by searching for it in the start menu.
The interface is simple and easy to understand. There are three main options:
- Capture Screen: Takes a screenshot of the entire screen
- Capture Window: Captures the active window
- Capture Selection: Lets you select a specific area using left-click and drag to capture.
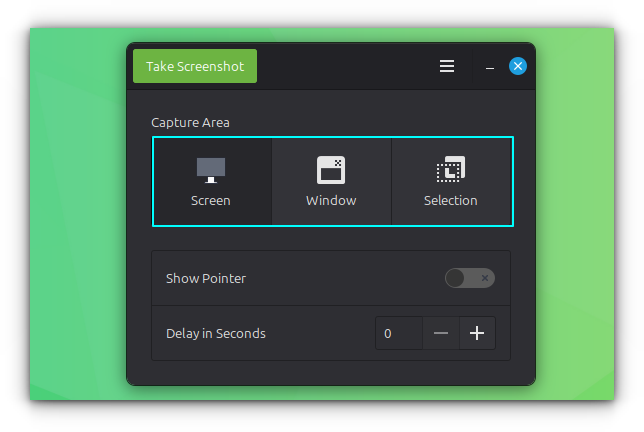
After choosing the method, click the Take Screenshot button at the top left of the window.
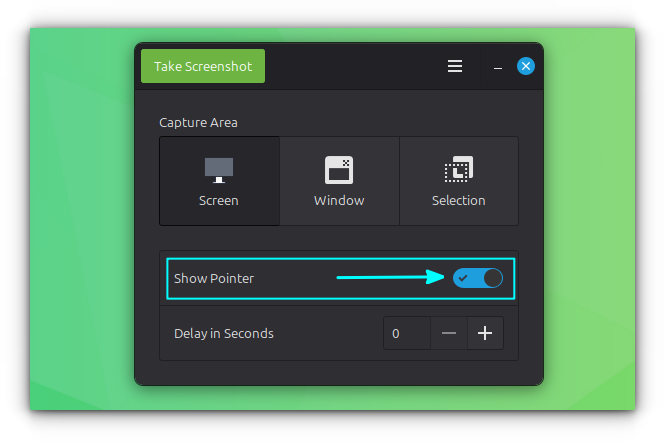
Show mouse cursor in screenshot
In the Screenshot tool, you will find an option called Show Pointer. Enable this if you want the mouse pointer to be visible in your screenshots.
Take screenshot with a delay
You can also set a small delay before taking a screenshot.
In the Screenshot tool, enter a value in seconds under the Delay in Seconds option.
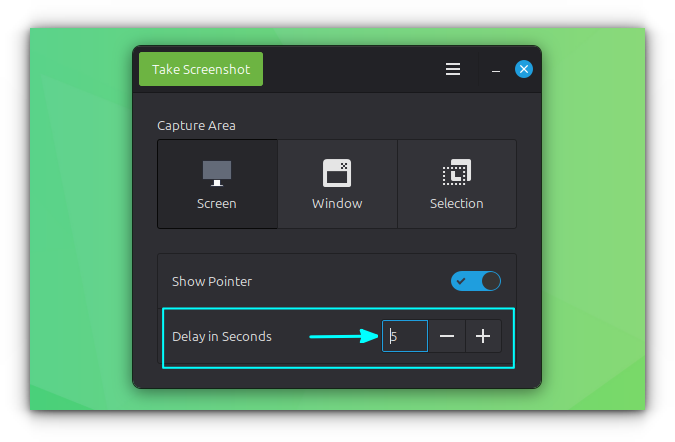
Once set, the tool will wait for the specified time before capturing the screenshot when using the GUI. For example, if you set it to 5 seconds, the screenshot will be taken after a 5 second delay.
Using keyboard shortcuts
If you prefer not to open a GUI app every time you take a screenshot, that is not a problem. Linux Mint provides keyboard shortcuts that let you quickly capture the screen in different ways.
Take the screenshot of entire screen
You can press the PrtScr key on your keyboard to capture the entire screen.
After taking the screenshot, you will be prompted to either save it with a name or copy it to the clipboard. This works well for basic use.
However, this can feel limited if you only want to capture a small part of the screen. The good news is that Linux Mint also provides an easy way to do that.
Take the screenshot of an area
To take the screenshot of a specific area, use the Shift + PrtScr shortcut.
Your screen will dim slightly and the cursor will change to a plus sign. Click, hold, and drag to select the area you want to capture.
Once you release the mouse button, you can choose to copy the screenshot or save it.
Take screenshot of a window
Sometimes, you may want to capture only the currently active window. While you can do this using the area selection method, using a shortcut is much more convenient.
Press Alt + PrtScr to take a screenshot of the active window.
There are a few things to keep in mind. If a menu is open inside the window, like a top menu or a right-click context menu, this shortcut may not work.
Also, if a dialog box is open, the tool will capture whichever window is active at that moment, whether it is the main window or the dialog.
Record the screen
Many people do not realize that Linux Mint also includes a built-in screen recorder. It is not visible in the menus, so it is easy to miss.
Press Shift + Ctrl + Alt + R to start recording your screen. Use the same key when a recording is active to stop recording.
This is a basic tool, so do not expect features like those in dedicated applications such as OBS Studio or SimpleScreenRecorder. It simply records your entire screen.
When you stop the recording, the video file is saved in the Videos folder inside your Home directory.
Custom Shortcuts
In the previous section, we saw that the GUI tool offers options like delay and showing the mouse pointer, which are not available with the default keyboard shortcuts.
However, this does not mean you are limited. In Linux Mint, you can create custom shortcuts to include these actions as well.
The screenshot options
Before setting up custom screenshot shortcuts, it helps to understand the available options. Linux Mint uses the GNOME Screenshot tool for both the GUI and keyboard based screenshots.
GNOME Screenshot provides several useful options, along with many more that you can explore in its man page.
gnome-screenshot -w: Take the screenshot of current active window.gnome-screenshot -a: Take the screenshot of a select region by click and drag.gnome-screenshot -d 5: Add a 5 second delay before taking a screenshot of the entire screen.gnome-screenshot -d 5 -p: Apply a 5 second delay and include pointer in the screenshot.gnome-screenshot -d 5 -a,gnome-screenshot -d 5 -w: Take screenshot of select area/window respectively with a 5 second delay.
Setting custom screenshot shortcuts
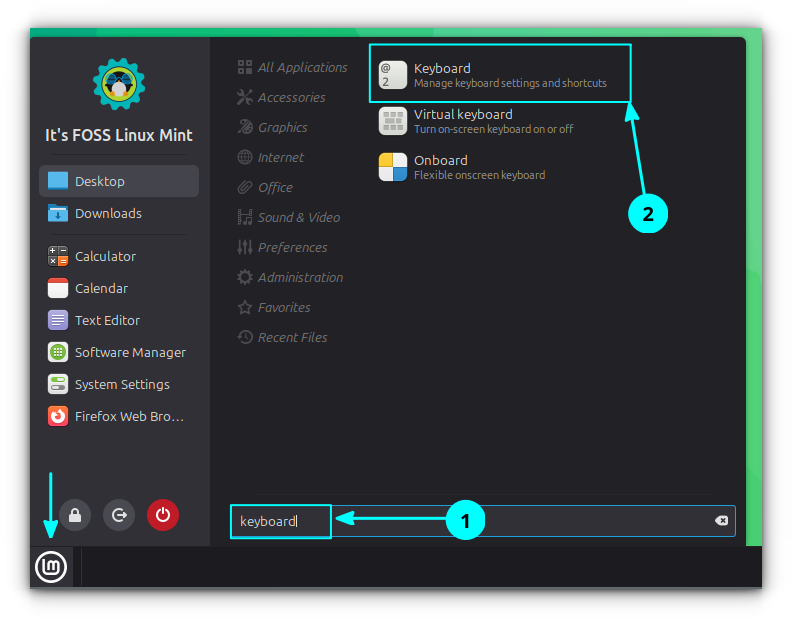
Search for and open Keyboard from the start menu.
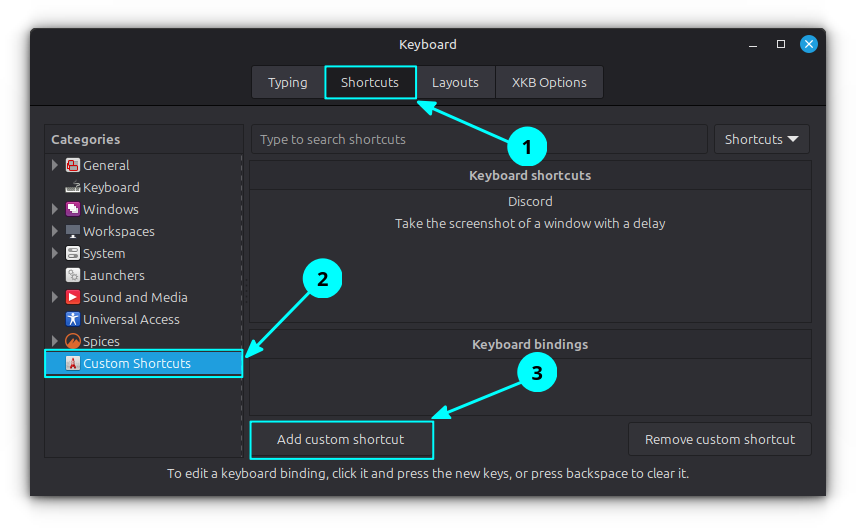
Go to the Shortcuts tab and then select Custom Shortcuts. Click on the Add custom shortcut button.
Now, enter a name for the shortcut. For example, you can use "Take screenshot of an area with a delay" in the Name field.
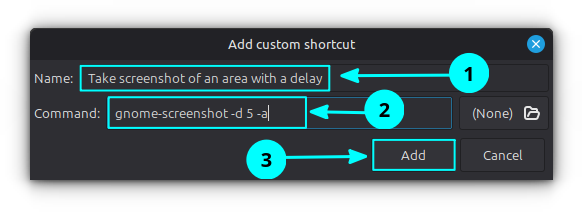
In the command field, enter the required command. For example, use gnome-screenshot -d 5 -a, and then click the Add button.
The command will now be listed. To assign a shortcut, select it under Keyboard shortcuts and click on the Unassigned option in the Keyboard bindings section.
Add the keybinding to the custom command.
You will be prompted to press a key combination. Press the shortcut you want to use.
You can repeat the same steps to create and assign shortcuts for other commands based on your needs.
Other screenshot tools
Sometimes, basic screenshots are not enough. You may want to annotate an image or add borders and other adjustments.
These are image editing features, and they are not available in the default Screenshot tool in Linux Mint.
For such needs, you can use third party screenshot tools that offer more control and customization.
We have a separate article that covers screenshot tools you can use in more detail. You can refer to it to find options that suit different needs and use cases.
As a quick note, Flameshot and Ksnip are two good screenshot tools you can use for editing and customization. You can also use Gradia that also provides basic editing.
Did you find it useful? Feel free to share your thoughts in the comments.